Showing posts with label furniture. Show all posts

Wednesday, June 17, 2015

Retro Summer Ideas!


Today I am welcoming Ty Leisey with a Guest Post.  Thank you Ty!


Ideas for a Retro Summer


As the summer months roll in and the temperature starts to climb, kids and adults alike rush to finally spend time outdoors. But why leave your wonderfully vintage style behind? Instead of choosing between spending time in your perfectly designed kitchen or spending time outdoors with your family, bring your style, family, and food outside with these retro exterior design ideas.


Update Your Furniture:


Spending time outside can be much more comfortable with the addition of outdoor furniture, and you already know how much your furniture says about your style. Whether you already have outdoor furniture or if you’re looking to add a seating space in your yard, there are ways to create a cohesive style for your home and comfortable outdoor living. Choose an option based on your existing space / furniture, your outdoor living needs, your budget, and the amount of time you want to spend creating the look you want.
  • Paint existing furniture: if you already have furniture you love or you don’t quite have the budget to replace your furniture, consider painting your existing furniture to better match your style. Try colors like a bright aqua, a vibrant green, or even an eye-catching red. Just adding color can make a huge difference and help your keep that flow from inside to outside.
  • Find vintage furniture: Yard sales and flea markets are great places to find retro style outdoor furniture for much cheaper than vintage stores or online stores. Check your local newspaper for yard sale listings and flea market advertisements - it may take a little extra time and legwork to find the perfect piece but it may end up being better than what you thought you wanted (likely at a better price, too).
  • Buy new furniture: If you can’t seem to find anything in the local market or if you need something now and can’t afford to wait, there are tons of websites and stores with online ordering that sell vintage and retro style furniture. With lots of options for colors and types of pieces available, you can create the perfect outdoor living space to compliment your indoor living space.


Redesign Your Lighting:


It stays lighter much later in the summer but that doesn’t change your need for outdoor lighting for late evening dinner parties! Maybe your yard has lighting options that are boring (or don’t match your newly acquired furniture!), or maybe you’ve gone without extra lighting up to this point. Either way, you can pretty easily find retro style light fixtures that are both functional and stylish. Be sure to think about where you need the most light, what options will work with your exterior, and what particular styles you should be looking for. Though not impossible, it’s much easier to find permanent outdoor lighting fixtures online or in-store than it is to find them in local markets, and they’re more likely to be ready to install right away. An upgrade can be as easy as fitting a lamp over a previously existing fixture or as time-intensive as installing a new lamp post. Remember to be realistic but don’t let that limit your imagination!


Create a Vintage Picnic Package:


The best part about redesigning your outdoor living space? Enjoying it by spending time outside! Keep it classy by putting together your own picnic package, starting with a vintage picnic basket. You can set up your picnics at any furniture you may have outdoors, at a nice picnic table in the backyard (or at least nearby), or spread out over a beautiful retro picnic blanket. Some stores will have sets of outdoor plates, flatware, and serving utensils for a classy setup, but it’s just as traditional to go the paper plate route and ensure quick cleanup that everyone can help with. A beautiful picnic basket makes for a stellar display when not in use that can double as storage for picnic supplies. Plus, keeping the basket and supplies in the same place means all you have to do is watch for a sunny day and wait for the pie to come out of the oven!


Thanks for your visit!
 
Pam


Saturday, June 6, 2015

Transferring a Graphic onto Wood-Turning a $6 Investment into a Cute Piece


Since I started working a few years ago, my crafting has been limited, but recently I decided to use some new graphics (purchased on Etsy for $1) and transfer them onto a little dresser.
 
 
I started with this $5 garage sale find.  Sorry, I thought I took a good 'before' picture, but didn't...  But, you can probably figure that the drawers looked just like the rest of the piece.
 
 
We sanded down the entire piece.


I  took a mirror image of a laser copy (if you only have an ink jet printer, just take it to Kinko's or a similar place and get a copy made--they use laser copiers).  I printed off three copies-one for each drawer.


 I taped the graphic on each of the drawers.  I barely dabbed Citra-Solv on the paper.  (I found Citra-Solv at Whole Foods)  If you put too much Citra-Solv on, it'll smear.  I rubbed a piece of plastic very carefully over the graphic, but again, I tried not to smear it. 


I carefully lifted off the paper and let each drawer dry.


I put MinWax Pre-stain over the entire piece, as pine tends to get blochy if you don't.  After that dried, I applied a MinWax Natural Stain.

The original drawer pulls were wood.  I worked and worked to sand them down, but they stained up too dark.  I took some brass pulls and painted them black.
 
I've moved it in a couple of different places to see where I'm going to use it.  I think it turned out pretty cute! 
 
Thanks so much for your visit!
 
Pam


I am linking to the following parties:


Dwellings-The Heart of Your Home


Sunday, April 19, 2015

Industrial Pipe and Mahogany Table


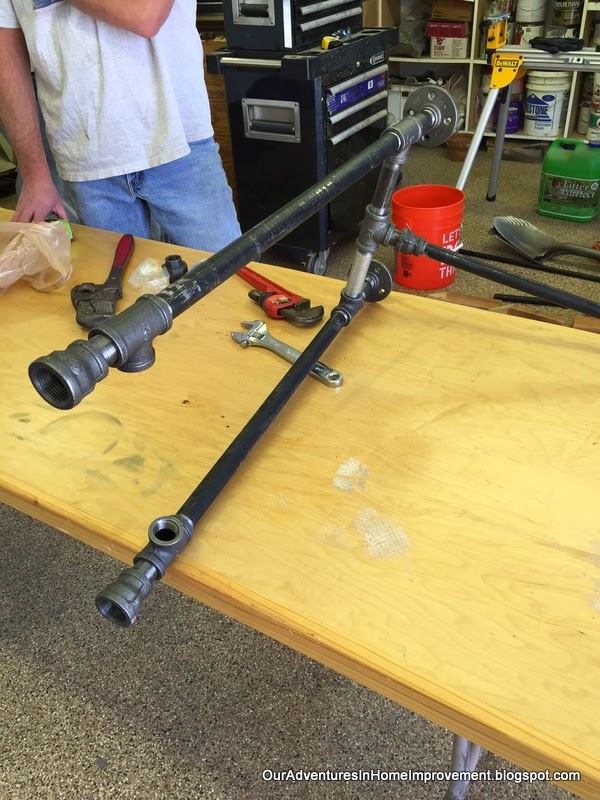
My husband is an incredible woodworker.  Recently, he decided to build a table base out of plumbing pipes rather than wood.  (yes, I was a bit shocked!)  :) 
 
 
Lots of pipe and connectors from Home Depot.
 
 
He painted everything black. 
 
He made the top out of mahogany.  It is such a beautiful wood!


It really came out nice!


Thank you for your visit!
 
Pam


I am linking to the following parties:


Dwellings-The Heart of Your Home


Friday, April 19, 2013

New Carpet Brings on a Table Makeover


I bought a pine table a few years ago to put in my office. I collect typewriters and adding machines and wanted a place to display them. This table wasn't the perfect size, but it was $30 and I figured we could make it work. So we 'made-do' with it until a couple of weeks ago when we had to clear the room out for new carpet. 
 
Here it is right before my husband started working on it...  It was all this color and quite large.  (I looked and looked for a 'before' picture, but I guess I always knew it wasn't right and didn't take any pictures!)


After he cut off 12" from the width, he routed the edges and sanded everything down.


He primed all of the lower pieces.


Then several coats of white paint were applied.


The top got stained.


 Then everything got put back together.


Bailey had to be right in the middle of the action...


The new size works so much better in this room.  I love the dark top too!


Thanks for your visit!


Pam


I am linking to the following parties:


Dwellings-The Heart of Your Home

Sunday, January 13, 2013

Pottery Barn Inspired Buffet


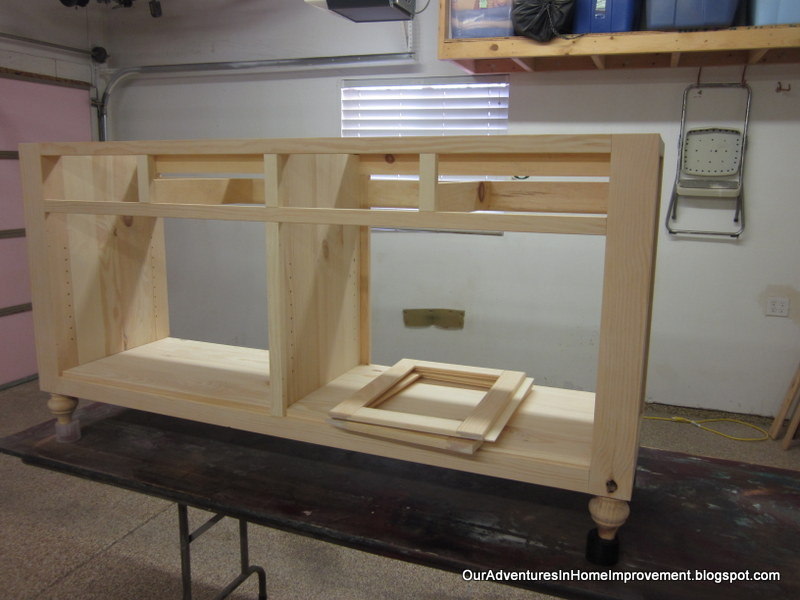
Each Christmas, my husband likes to make me a piece of furniture.  This year we wanted some sort of table behind the couch.  We thought about a simple, two shelf table that would display some scales, apothecary jars, etc., but then decided that a buffet with much needed storage for extra dishes would be perfect.  We were in Pottery Barn and saw this piece and were inspired.

We loved the look of it, but it was too tall for our needs.  Well, with a husband who can make just about anything, that really wasn't a problem.  He made a piece that works perfectly for us.


He made this out of pine, as we love the look of it.  It took him about three weeks start to finish.  In those three weeks, we had Christmas, he has a full time job that does not involve woodworking, and we had two snowstorms that dumped over two feet of snow on us!  (meaning, snowblowing before woodworking on several days).  He is so dedicated to making everything perfect and getting things done!


He used Minwax Provincial Stain to get the dark color.


We ordered the feet from Osborne Wood Products and the handles/pulls from Pottery Barn.  


We wanted something different for the doors.  We looked at several types of wavy glass and beaded glass, but wanted the things inside the cabinet to be somewhat hidden.  So we came up with this:  We ordered eight pieces of glass and put these mesh inserts (from Hobby Lobby on sale for 41 cents each!) between the glass.  We are thrilled with the way the doors came out (even though it's proven almost impossible to get a good picture of them!) 


The drawers are made of maple and will hold my Mom's silver.  We've been using it quite a bit lately and absolutely love it!  It'll be nice to have all of the pieces so close.


When we brought it in the house yesterday, without the doors on, here was Bailey to make sure everything was ok. 


We put the red scale on that my husband refurbished a couple of months ago, along with the Chelsea lamp and burlap shade from Pottery Barn.  And, the most important item on there is the little chocolate lab in memory of Max.  :)


I am so happy with this piece and can't wait to fill it up.
Thanks for your visit!
Pam


I am linking to the following parties:

 Debbiedoo's Newbie with a Twist
Common Ground's Be Inspired Party


DIY Show Off

Furniture Feature Fridays