Wednesday, March 26, 2014

Daffodils in Bloom!

 
Yes, Spring has Sprung at my house!  I love it when the daffodils are blooming.  Not much else is just yet, so they make me really, really happy!


Thanks for your visit!
Happy Spring!
 
Pam
 

Thursday, March 20, 2014

Power Tools-- Guest Post


Today I am welcoming Daniel Foord with a Guest Post.  Thank you Daniel.


What defines a power tool as being ‘Industry Standard’?


For anyone that has needed to complete a domestic task like clean the car, clear leaves from the patio, or drill some holes for cables, there are a wide range of suitable machines available that can adequately deal with these types of jobs. These will include power tools, measuring tools, cutting tools, and air tools that can be acquired from a general purpose hardware merchandise shop.


There are also a host of tasks, which may be encountered through the process of domestic maintenance, where the types of machines available are simply not powerful enough to cope with the requirements of the job. There are some obvious safety reasons for not distributing the type of equipment that is necessary for this work to the general public. In some cases specialist training is needed before an individual is approved for use. Some pieces of industry standard equipment will only be available through an authorised vendor to a person with the appropriate trade credentials.


The defining factors for an industrial power tool are the level of expertise required to use the equipment and the output power of the device. There are ISO standards which regulate the classification of all machinery and these are used to decide whether a product is of a domestic, or industrial standard.


Finding industrial power tools


The majority of power tools, even industrial standard power tools, are available to members of the public without the need for specific training or qualifications. These can be sourced through merchants that deal specifically with a particular trade. A local directory service or business contact can help to locate these types of outlets. It is also possible to obtain industry standard power tools through reputable internet sites. When dealing with companies via the web it is essential to vet the site properly and check that they have the correct certification to handle the types of goods on offer. The site should have the correct mark badges and dealership approval illustrated on its pages. It is advisable to check the validity of any claims made about the approval to use or sell this equipment by making direct contact via email or phone. Through this form of contact it should be possible to obtain copies of any of the relevant certification for the machinery.


Buy or lease


As the type of equipment involved can be considerably expensive there are usually a variety of payment plans available for industrial power tools. Leasing is a popular option, particularly if the job will be completed in a short time frame. When purchasing this type of equipment outright it is worthwhile checking on resale value and any legal requirements for selling as it may be acceptable for member of the public to buy a particular tool, but there may be restrictions on any onward trade.


Author Bio - Daniel Foord has published a wide range of websites and is a regular contributor to blogs on a variety of topics including trade and industry. He researches on sites including Buck and Hickman in order to stay at the cutting edge of the latest industry news and developments.

Monday, March 17, 2014

Out with the Carpet, In with the Wood


My husband's 'Mancave' is the room above the garage.  I've heard them called a FROG (Family Room Over Garage) or Bonus room.  Whatever they're called, his is a big room with all of the requisite Mancave stuff.  :)

Recently, he decided he'd had enough of the carpet in there.  We were a little concerned about what was going on under the carpet, as there were a couple of "lumps" (for lack of a better word). 


He pulled out the carpet and found that some of the subfloor had buckled and/or wasn't completely seated on the joists.  Lovely....

So, all of the subfloor needed to be removed.  If you've ever removed subfloor, you know what a beast it is to pull up.  It is nailed and glued to every joist!!   Yes, we know how to have fun!  Add to that that the elliptical was too heavy to get down the stairs and out of the way, so we had to keep moving it as we worked.


I am not a goat or a gymnast.  I do not like walking on thin strips of wood.  I played volleyball and basketball. I never once had a desire to do the balance beam.  So to say I was not happy walking across this 400 square foot room on 1 3/4" slices of wood, would be a bit of an understatement...  But, I was successful and never once went through the sheetrock below!  (and I was able to move my end of the elliptical each time while balanced on that 1 3/4" board!)

We had to carry each sheet of subfloor upstairs, put in a lot more cross-joists and then lots of gluing, nailing and celebrating once another 4x8 slab of easy walking was complete!  :)


This weekend was the install weekend.  For much of the time, I was the pneumatic nailing woman.  Other times I was the tap the next board in place woman.  I think this job would've been a lot easier on my body 10 years ago!! 


We chose pre-finished Acacia hardwood.  We have walnut in the rest of our house, but because my husband lifts weights up there, he was afraid that the walnut might dent.  Acacia looks very much like it, but is three times harder. 

After 2 1/2 days of laying the floor, repainting the nicks in the walls, repainting the moulding, then reinstalling it, then carrying all of the contents back upstairs (including 300 pounds of free weights!), we now have a beautiful (wait, did I say WE?) HE has a beautiful new Mancave!


We have company coming this weekend, so get to rest and have fun.  After that, it's redoing the stairs up to the Mancave.  I'll be posting those pictures in a few weeks.  In the meantime, I'll be resting my sore body and shopping my heart out with my dear friend. 
 
Thanks for your visit!

Pam
 
 
I am linking to the following parties:


:


Dwellings-The Heart of Your Home

DIY Show Off


The Scoop #110 at Stone Gable

Saturday, March 1, 2014

More Fun and Games for the Game Room


I love antique shows and flea markets, especially during the winter when there aren't any garage sales going on.

Recently I found a Chinese Checkers board at a flea market.  It didn't come with any of the marbles, but good ol' Amazon had someone selling a complete set for $5. 

I wanted to display the board on the wall of my Game Room, so used Tacky Glue and a toothpick and filled each hole.  I set each marble in and let them dry.  Instantly I had colorful artwork for the wall!


Recently, I found this old bank and a jar of marbles.  The bank works by collecting nickels, dimes and quarters.  When the value in the bank reaches $10, you can open it.  Yes, we now put our change in each evening.  My husband knew exactly how it worked, as he'd had one of these growing up.


I love the colorful jar of marbles.  It came with a new lid, so I just changed it out to an old zinc lid and love the new look!


What fun things have you found lately?
 
 
Thank you for your visit!
 
Pam


I am linking to the following parties:


Dwellings-The Heart of Your Home

DIY Show Off


Friday, February 7, 2014

Wooden Twine Holder


At Christmas, I saw this wooden spool holding a roll of twine in a Crate and Barrel ad.  I thought it looked so neat!  I asked my husband if he could make some?  Yes!


He started with a walnut board. 


He planed it down till it was smooth.


He was able to cut the circles using his router and drill press. 


He used walnut dowels to keep everything looking consistent.


He used MinWax English Chestnut stain.

And MinWax Wipe on Poly to finish it.
 
 
I bought a roll of twine from Michael's and put it in there.  I am on the lookout for some neat old scissors too!
 
 
It cost about $5 each for the wood.  The twine was $3 with a coupon at Michael's for a total of  $8 each.   I think he did a great job!
 
Thank you for your visit!
 
Pam


I am linking to the following parties:


:


Dwellings-The Heart of Your Home

DIY Show Off


Wednesday, February 5, 2014

Creating a Wooden Plank Wall--Guest Post

Today I am welcoming Peter Boucher with a Guest Post on Creating a Wooden Plank Wall.  I've always loved planked walls.  Thanks Peter for this information!


How to Create a Wooden Plank Wall

Wooden plank walls are a beautiful and unusual way to create an accent wall. Perfect for rooms with a natural theme, wood can be very versatile as it can be painted or varnished any way you want it to be.

Working It Out

There are lots of different ways to style a wood plank wall. Whether you go for thick or thin, horizontal or straight, painted one colour or three, it’s all doable. But figuring out exactly what you want is the easy bit. Take a look at Pinterest for endless hours of inspiration.

Prep and Paint

A wooden plank wall is a bit more work than your regular paint – or wallpaper job. However, the finished article is much more impressive.

First, you need to realise that this may be a job with a bit of to-ing and fro-ing. Start by measuring the wall so you know its dimensions. Then head out to the nearest hardware store and pick up some wood. The amount of wood that you’ll need will depend on its thickness and the size of your wall, so you might end up needing more wood than you first expected. You’ll also have to decide whether you want one plank as long as your wall or several planks to fit along one row.

Paint or varnish your wood to your desired finish, then cut if necessary.

Building the Wall

The method that you use to attach your planks to the wall will depend on the thickness of it. Whether you use wood adhesive, a nail gun or screws is up to you, the wood and the effect you want to achieve. If you want something reliable and permanent, it is advisable to use a drill, like this one from Elcocks, and screws or nails.

Start from the bottom, making sure that each plank you lay is straight. Add row upon row, and if you come to light switches or plug sockets, then you have two choices. Either start from the edge of the wall and work your way in, and cut the wood to shape when you get to the socket, or work your way out from the socket instead. The latter method is less hassle when it comes to cutting to shape, but it may not work for everything, like a sink, for example.

Once it’s finished, sit back and admire your beautiful wood plank wall.


Saturday, February 1, 2014

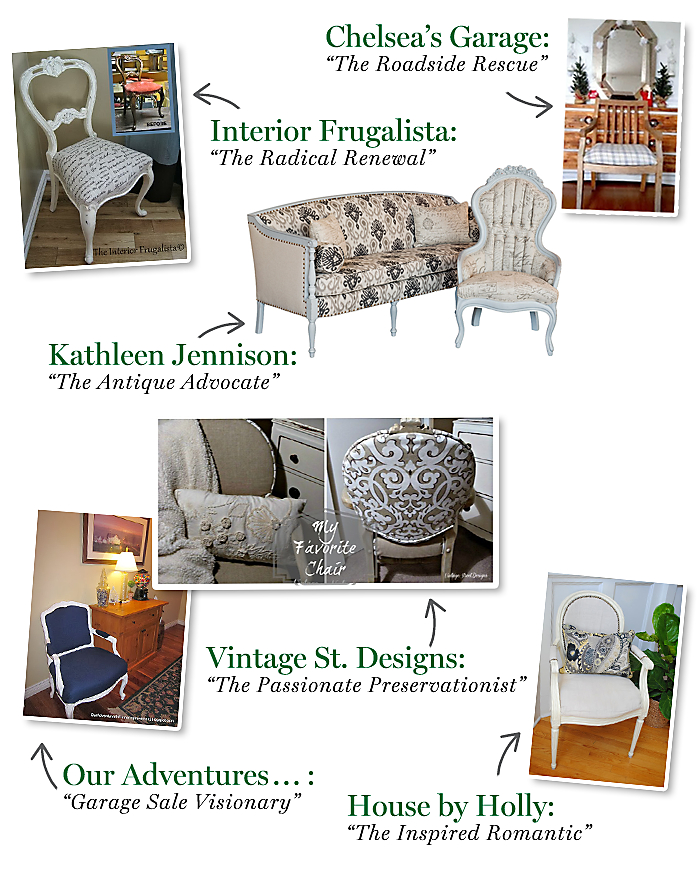
My Chair was Featured at One Kings Lane!


I'm so excited that One Kings Lane has featured my $2 chair transformation! 
 
Here's my original post: 


Check this out!


Garage Sale Visionary


Meet the Bloggers Who Inspired Us!
There’s more to DIY than the ‘D’ and the ‘I’—and these brave bloggers showed us a thing or two about tackling tough projects. In sharing their favorite statement chairs, each of the following ladies proved that, with a little love (and elbow grease), any chair can go from drab to fab!
And the awards go to…
Chelsea, of Chelsea’s Garage, found this pretty country-style spin on a classic Sheraton chair sitting by the side of the road. With freshly upholstered interchangeable seat cushions, she turned it into this sweet little multitasker—a true “Roadside Rescue.”
Marie, of Interior Frugalista, went in for a quick refresh, but quickly realized this Victorian buckle-back chair was going to be a lot more work. After removing its original straw stuffing and adding new upholstery and a fresh finish, she accomplished what we can only call a “Radical Renewal.”
Interior design pro Kathleen Jennison has the art of transforming antique chairs into modern creations down to a science, and we love her vision! Her roster of statement chairs—all reupholstered with her magic touch—gives her the honor of “Antique Advocate” in our book.
We love how Judy, of Vintage Street Designs, knew the vibe she wanted for this French-inspired Colonial revival chair, and brought it to life. Her total transformation infuses a dose of Parisian elegance and French country charm to her “Inspired Romantic” DIY.
Holly, of House by Holly, found this Louis XVI seat on a curb, and defied the odds to bring it back to its former glory! We’ve dubbed her a “Passionate Preservationist” for her ability to see the potential of this regal seat.
Pam, of Our Adventures in Home Improvement, is a true “Garage Sale Visionary.” The heart and soul of this DIY was giving this tired Louis XV fauteuil a new lease on life—and we applaud her tireless efforts, and amazing results!

 
Thank you so much to One Kings Lane and thank you for your visit.


Pam