Friday, February 7, 2014

Wooden Twine Holder


At Christmas, I saw this wooden spool holding a roll of twine in a Crate and Barrel ad.  I thought it looked so neat!  I asked my husband if he could make some?  Yes!


He started with a walnut board. 


He planed it down till it was smooth.


He was able to cut the circles using his router and drill press. 


He used walnut dowels to keep everything looking consistent.


He used MinWax English Chestnut stain.

And MinWax Wipe on Poly to finish it.
 
 
I bought a roll of twine from Michael's and put it in there.  I am on the lookout for some neat old scissors too!
 
 
It cost about $5 each for the wood.  The twine was $3 with a coupon at Michael's for a total of  $8 each.   I think he did a great job!
 
Thank you for your visit!
 
Pam


I am linking to the following parties:


:


Dwellings-The Heart of Your Home

DIY Show Off


Wednesday, February 5, 2014

Creating a Wooden Plank Wall--Guest Post

Today I am welcoming Peter Boucher with a Guest Post on Creating a Wooden Plank Wall.  I've always loved planked walls.  Thanks Peter for this information!


How to Create a Wooden Plank Wall

Wooden plank walls are a beautiful and unusual way to create an accent wall. Perfect for rooms with a natural theme, wood can be very versatile as it can be painted or varnished any way you want it to be.

Working It Out

There are lots of different ways to style a wood plank wall. Whether you go for thick or thin, horizontal or straight, painted one colour or three, it’s all doable. But figuring out exactly what you want is the easy bit. Take a look at Pinterest for endless hours of inspiration.

Prep and Paint

A wooden plank wall is a bit more work than your regular paint – or wallpaper job. However, the finished article is much more impressive.

First, you need to realise that this may be a job with a bit of to-ing and fro-ing. Start by measuring the wall so you know its dimensions. Then head out to the nearest hardware store and pick up some wood. The amount of wood that you’ll need will depend on its thickness and the size of your wall, so you might end up needing more wood than you first expected. You’ll also have to decide whether you want one plank as long as your wall or several planks to fit along one row.

Paint or varnish your wood to your desired finish, then cut if necessary.

Building the Wall

The method that you use to attach your planks to the wall will depend on the thickness of it. Whether you use wood adhesive, a nail gun or screws is up to you, the wood and the effect you want to achieve. If you want something reliable and permanent, it is advisable to use a drill, like this one from Elcocks, and screws or nails.

Start from the bottom, making sure that each plank you lay is straight. Add row upon row, and if you come to light switches or plug sockets, then you have two choices. Either start from the edge of the wall and work your way in, and cut the wood to shape when you get to the socket, or work your way out from the socket instead. The latter method is less hassle when it comes to cutting to shape, but it may not work for everything, like a sink, for example.

Once it’s finished, sit back and admire your beautiful wood plank wall.


Saturday, February 1, 2014

My Chair was Featured at One Kings Lane!


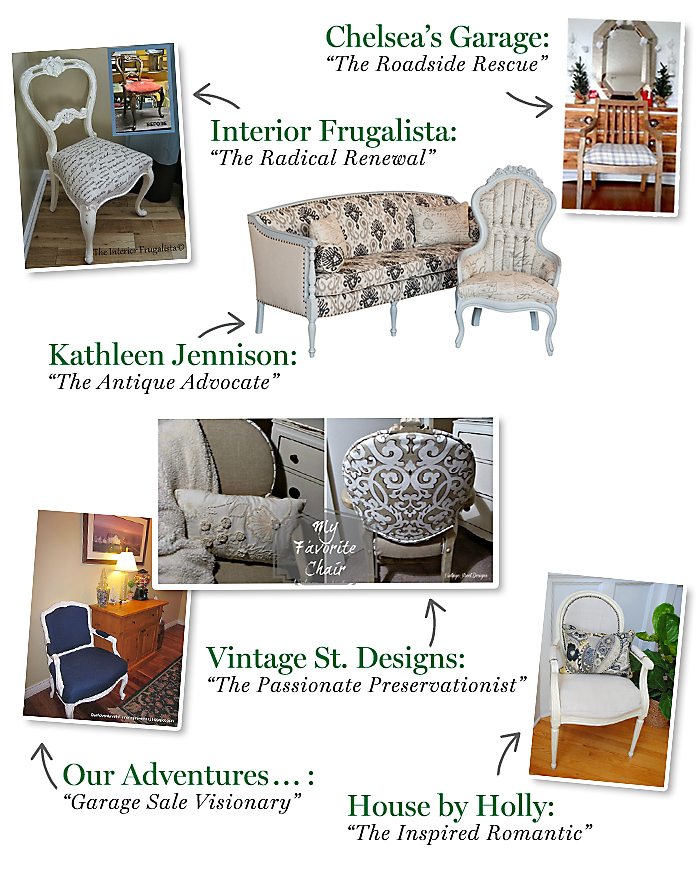
I'm so excited that One Kings Lane has featured my $2 chair transformation! 
 
Here's my original post: 


Check this out!


Garage Sale Visionary


Meet the Bloggers Who Inspired Us!
There’s more to DIY than the ‘D’ and the ‘I’—and these brave bloggers showed us a thing or two about tackling tough projects. In sharing their favorite statement chairs, each of the following ladies proved that, with a little love (and elbow grease), any chair can go from drab to fab!
And the awards go to…
Chelsea, of Chelsea’s Garage, found this pretty country-style spin on a classic Sheraton chair sitting by the side of the road. With freshly upholstered interchangeable seat cushions, she turned it into this sweet little multitasker—a true “Roadside Rescue.”
Marie, of Interior Frugalista, went in for a quick refresh, but quickly realized this Victorian buckle-back chair was going to be a lot more work. After removing its original straw stuffing and adding new upholstery and a fresh finish, she accomplished what we can only call a “Radical Renewal.”
Interior design pro Kathleen Jennison has the art of transforming antique chairs into modern creations down to a science, and we love her vision! Her roster of statement chairs—all reupholstered with her magic touch—gives her the honor of “Antique Advocate” in our book.
We love how Judy, of Vintage Street Designs, knew the vibe she wanted for this French-inspired Colonial revival chair, and brought it to life. Her total transformation infuses a dose of Parisian elegance and French country charm to her “Inspired Romantic” DIY.
Holly, of House by Holly, found this Louis XVI seat on a curb, and defied the odds to bring it back to its former glory! We’ve dubbed her a “Passionate Preservationist” for her ability to see the potential of this regal seat.
Pam, of Our Adventures in Home Improvement, is a true “Garage Sale Visionary.” The heart and soul of this DIY was giving this tired Louis XV fauteuil a new lease on life—and we applaud her tireless efforts, and amazing results!

 
Thank you so much to One Kings Lane and thank you for your visit.


Pam