Thursday, December 27, 2012

Game Room Updates and Another Scale Redo!

We love our Game Room and the kitchen attached to it.  We have been working on it since we moved in to get it decorated in our style.

My Dad gave us this old Coke machine years ago.  I found this Maid of Honor washtub at a garage sale last summer.  I may leave it here, or may take it outside this summer and fill it with flowers.  I do love the chipped paint and rust (which won't last if it goes outside)...


We decided to change out the glass shades on the pendants.  The old ones were very nice, but way too modern for our taste.  We like how these look.


Here is my husband's latest refurbishment.  It took him weeks to take the hundreds and hundreds of parts apart, paint, have some parts re-brassed and then put everything back together.  As he says with every scale he takes apart, he doesn't think he'll ever get it back together again, but he always does.  :)  We have the glass on order for the base.  Once that comes in, it'll be complete.


Here was the 'before'


And here is the 'during'


I love this bottle capper. We found it this fall at Barb's store Treasures From the Heart in Eugene, Oregon. It got a new coat of paint and an old box of bottle caps from ebay and now we're set. Now we need some bottles to cap!


 Thank you so much for your visit and kind comments!


vif187 Photobucket
Debbiedoo's

Tuesday, December 18, 2012

Fat Tire Sign on "Aged" Wood


This summer when we were on vacation, we found this free poster in a store.  We loved the look of it and wanted to make something fun for the Game Room.


I started by finding new, beat up fence boards from Lowes. My husband glued them together.


I then applied my trusty apple cider vinegar and steel wool trick to 'age' the boards.   It's so easy.  Just let the pieces of steel wool soak in the apple cider vinegar either for a few minutes or even overnight, then wipe the vinegar on the boards.  These looked 'aged' in two coats!


After one coat...


After the second coat. (about an hour after starting)


At the ends, where the cuts were made, I used a drywall knife and made the edges look torn up. I then dabbed on more of the apple cider vinegar to age those cuts.

We used a spray adhesive to get the poster to stick to the boards.


A simple hanger on the back and free art was ready for the wall!


Thanks for your visit!
 
Pam


I am linking to the following parties:

Creative Cain Cabin's Budget Decorating Party


vif187

Friday, December 14, 2012

An Oldtime Pinball Machine for the Game Room

We love hanging out in our basement family room/ game room.  We collect vintage games such as Pachinko and some old ball shooter games.  Today as I was on our local 'Craigslist-like' online marketplace, I saw an ad for an old pinball machine.  I do a lot of garage-saling and looking online and have not seen one like this before.  I thought it would look great in the game room.  Of course, it was crazy-worry time for me as we had to drive home 30 miles with it in the back of the truck.  Luckily it made it and my worst "old pinball machine strewn all over the freeway" fears didn't come to pass.  :)


I absolutely love the graphics painted on the sides of it.  We think it is a pretty old one based on the birds' eye maple wood on the edges and legs. 


My very handy husband will be digging into it soon and hopefully get it working perfectly again.  In the meantime, I'm just excited to have it!
Thanks for your visit!
Pam

With the rest of the world, my thoughts and prayers are with Newtown, CT.


Sunday, December 9, 2012

Bird Pillow for Christmas and Beyond

I found this cute bird graphic the other day.  I love, love, love anything with birds on it and love that I can incorporate it with my Christmas decorations.  Of course I intend to keep it out long after Christmas!


I started with this graphic from The Graphics Fairy
 
 
I printed it off on Jolee's Easy Image Transfer Sheets using my inkjet printer.


I cut around the edges.
 
 
I used a Ritva pillow cover that I bought from Ikea last year. 


I put the pillow cover over a board and a pillow case.


I followed the directions on the Jolee's label--twenty seconds on each part, lift up carefully, then set the iron back on another place.  I made sure I got each area several times for 20 seconds each.


I let it cool for 10 minutes, then carefully pulled the backing off of the transfer.
 
And here's the finished pillow.  Easy and Festive!


Thanks for your visit!
 
Pam


I am linking to the following parties:


The Graphics Fairy
UndertheTableandDreaming
My Uncommon Slice of Suburbia

Sunday, December 2, 2012

It's Ornamental! Easy Christmas Decorations

I collect antique apothecary jars and display them on my mantel.  At Christmas I like to change them up by taking out the candy and putting glass ornaments in them.  It's a great way to bring Christmas color to the mantel and most importantly, I don't have to find a place to store the jars during the holidays.


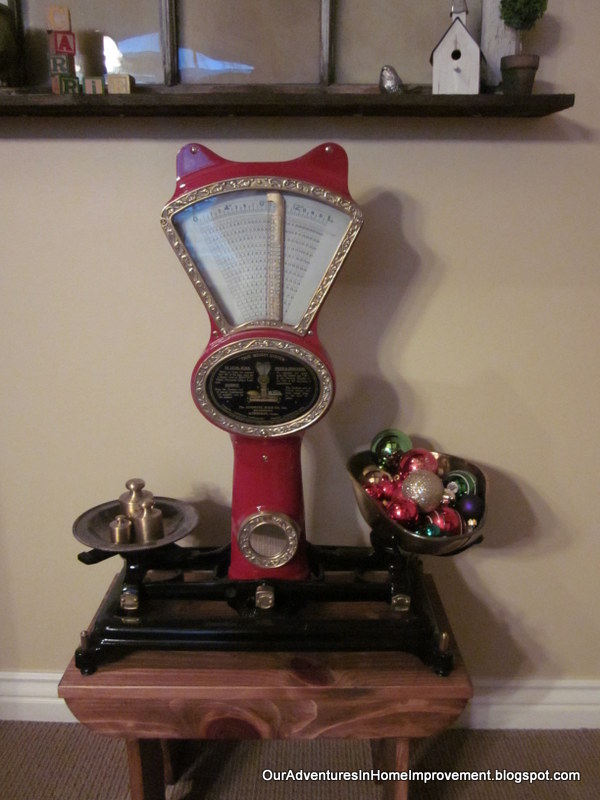
A few years ago when I was changing out the jars, I decided to also change out the things on my candy scales.  I love them in there too.


This picture doesn't do the shininess of the ornaments justice.  They really pop in here.


Well, I was on a roll with the ornaments this year and decided to add them to an old canning jar.  I'm really happy with this look too. 
 
 
So there you have it.  A super-easy, super-inexpensive way to bring in some Christmas color.


Thanks so much for your visit and comments!
 
Pam
 
I am linking to the following parties:


>