Sunday, March 27, 2011

My New Adirondack Chairs

For my birthday a couple of weeks ago, we went out and bought a pair of Adirondack chairs.  I'd been wanting them for years and was excited about finally getting some.  As the clerk gave me my receipt, she said, "Make sure you never leave them out in the rain, or they'll split."  Are you kidding me??  We get crazy weather here and yes, they will get wet!  The chairs sat unassembled in the boxes for a week.   I was concerned that they wouldn't even last a year.  My husband was thinking the same thing and researched building plans for them.  He had me return the chairs and immediately went out and got wood to get started.


I didn't take pictures of the mess from planing down all of the wood, but let's just say our trash was very full and very dusty for two weeks!


They are coming together nicely! 


He put cork plugs in all of the screw holes.  80 holes per chair! 
The piece that's missing is so he can reach the screw holes in the back of the chair.  He assures me that he will be attaching that piece before he is done.  :)


The corks have been sanded down and the final piece has been attached.


Done!  I am so happy!

(I do realize that a picture of this chair outside in the sun would be soooo much better, but since it's still snowing and yucky here, that picture will have to wait... )


Amazingly enough, these beauties ended up costing less than the cheap-o, don't-get-them-wet ones!
  I guarantee we will enjoy these much more and for a lot longer.  I love when I get homemade gifts and I will certainly treasure these!

Thanks for coming by!  I appreciate your visits and comments.

Pam

I am linking to the following parties:

Friday, March 25, 2011

I am Not a Fan of Crazy Spring Weather!

Two days ago I was outside in shorts--probably not a good look with how wintery-white my legs are right now--but it was beautiful outside!  I was able to cut back the perennials that I didn't get to this fall and do some general clean up in the yard.  I even saw this bird checking out the birdhouse for a potential new home.


My bulbs are slowly, slowly making their way up.  Good thing since none of the perennials are ready yet!


The weeping cherry is starting to get buds.  You can bet I'll do another post when this beauty is in full bloom!


And now today....


I know it's not a lot of snow, so I am not complaining too much (but still complaining!)

I did hear on the news last night that March, April and May are the wettest months in our area.  Darn it, why did I have to hear that??


I hope it's sunny and beautiful wherever you are today!  Please soak up some of the sun for me.  We're supposed to be stormy till next Wednesday....


Thank you so much for coming by.  I really appreciate your visits and comments!


Pam

Monday, March 21, 2011

I'm OK with this type of Scale

In honor of my Mom's birthday today, I wanted to show a collection that was inspired by her.  (But first, here's a picture of her along with me and my husband from a few years ago)  :)


When we were growing up, she had all sorts of great antiques, especially old scales.  She and I were shopping at the Portland Expo a few years ago and she found this one.  She was so excited to have found it in such good shape.
The couple she bought it from were so nice!  They invited us to their house later that night to see their extensive collection of scales, coke machines, general store memorabilia, etc.  It was the most fun ever!!  Not long after this trip, my Mom was diagnosed with cancer.  Eight months later, she lost her battle.  My Dad gave me this scale right after she died.  It absolutely means the world to me.  Every time I look at it, I remember how happy she was to find it and how much fun we had looking at the couple's collections!


I had been collecting my own scales via ebay, the Portland Expo, antique shows, etc.  Here are a few others that I love.


These are all fun as they are so tiny.  I'm always excited when I find them at antique shows. 


Most of my scales are candy or general store type scales, but some are scientific and postal scales.  The scientific scale on the middle shelf here was one of the first ones I bought.  I love the milk glass trays.
The burgundy Toledo scale is another of my Mom's that my Dad gave me.  Love, love, love it too!


Thanks for coming by.  I really appreciate your visits and comments!

Pam


p.s.   I would like to add a BIG THANK YOU to Lisa at Serendipity Chic Design  for sending me these salad tongs for winning her recent giveaway.  I love her blog and love these tongs!


I am linking to the following parties:

Saturday, March 12, 2011

Organizing the Other Side of the Closet

My husband is very good about putting his clothes back in the closet, but his side always looked messy!  We even put a coat rack in the corner so he could hang his sweatshirts from it.  Truthfully, it always looked terrible!


So, being the one who is overly anal about loves organization, I convinced him that we should add some shelves. 
Since all of the other shelves are painted in here, I got to painting....


Here is the new and improved, clean, organized closet! 


Yes, I am the one who color coordinates all of his shirts.  He used to complain that he didn't have this color shirt or that color shirt.  Now as soon as I get them home from the cleaners (or in the case of the polos, as soon as I've ironed them), I put them away by color.  This has completely eliminated his complaints about his shirt selection.  :) 


The whole project cost only $26. 


Since I try to finish my posts by giving full disclosure--here it is.  My husband couldn't care less about whether he has a bar, coat rack or shelves.  He puts his stuff wherever there is an open spot.  :)  But, I am in the closet several times a day and am a bit of a neat freak. I love that it is now neat and organized.  And we did save the rod so if we ever want to rehang it, we can. 


Thanks for coming by.  I appreciate your visits and comments!

Pam

I am linking to:

Thursday, March 10, 2011

A Cute Easter Gift from a Blogger Friend!

The other day Vicki at The Tapestry of Life let me know I'd won a giveaway from her blog.

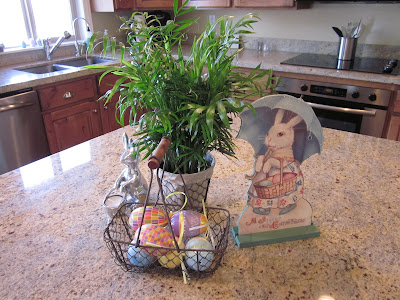
Yesterday this cute Easter decoration came! 


Thanks so much Vicki!  I love it!

Pam

Wednesday, March 9, 2011

This Dining Room is for the Birds!

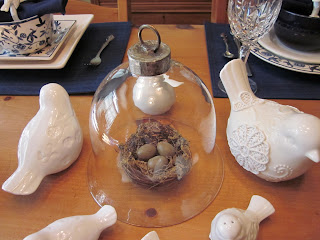
In the few weeks since I've been blogging, it's probably become apparent that I love anything to do with birds--little bird figurines, birdhouses, birdcages, eggs, etc.  You probably guessed that I love blue and white too!  My dining room decor is no exception.

I've never posted a tablescape before, but thought it might be fun to try one.


My good friend, Cindy, bought me the dishes.  I think they are so cute and I am so fortunate to have such a generous friend!


I found these ceramic bird napkin rings on ebay.


My husband made the dining table for me for Christmas many years ago. 


The cloche and the wooden birdcage were both bought from the BarnHouse boys.  Boy, do I miss their sales since we left Oregon!


Our plan with this room is to build a wall of cabinets where this pine cabinet is now.  Ellen, from Nouveau Stitch has some beautiful ones HERE and has given me the dimensions.  I cannot wait for my husband to start on them!


We have these pretty french doors.  Full disclosure here--the doors must be kept closed if the table is set.  Our cat thinks this room is for his enjoyment only....  :)


Thanks so much for coming by!  I really appreciate your visits and your comments!

Pam

I am linking to the following parties:
Between Naps on the Porch Tablescape Thursday
A Stroll Thru Life's Cloche Party  (yes, I know I only have one cloche in here, but it's my favorite)  :)
Happy to Design's Sunday Favorites
Under the Table and Dreaming's Sunday Showcase
Debbiedoo's Newbie Party

Thursday, March 3, 2011

Beachy Themed Master

We recently changed out the brass headboard we received as a house warming gift when we bought our first house in 1990.  :)  Yes, it was time to change it.  We struggled with what to replace it with.  My husband could make us a new one out of wood, but we didn't want to put a lot of money into a California King size when we were thinking of changing to a regular king bed.

So, we used the advice of Kate at Centsational Girl and made an upholstered headboard that was low cost and easy to make.  You can see that tutorial HERE


The hardest part was finding the fabric.  I learned that most (maybe all?) fabric patterns run the wrong way for this sort of project.  I didn't want the pattern to be going sideways and I didn't want a seam in the middle, so I had to use a solid fabric.

We used a piece of 1/2" plywood and cut it to 67" wide and 36" tall. 

We used 1/2 foam purchased at Joann's, and stapled that to the plywood. We used 1/2" foam so that the headboard wouldn't be too thick since we were attaching moulding to it.  I only put the foam on the front of the plywood. I topped that with batting, and wrapped it around to the back where I stapled it .  The fabric was then put down on the floor, face down, then the rest is set on it.  We pulled the sides tight and stapled them, then pulled the corners and made sure there weren't any gaps.  Once we were sure of everything being straight and pulled tight, we put lots more staples in to really hold it.


We then attached a 2 1/2" moulding around the edges, so the final piece is 72" wide and 38 1/2" tall.  We attached this 'picture hanging system' ($10 at Lowes) to the wall and to the headboard and hung it easily. 


Since our bathroom has a beachy theme (you can see that HERE),  I wanted this room to have the same feel. 


I found a set of these shams on ebay.


I found a little accent pillow to match the shams, but was not going to spend $44 for one!  I ended up making my own.  Yes, it looks like a homemade pillow, but it was fun, it cost $5 to make, and we like it.  I cut three starfish out of felt and glued them on, then sewed a few straight lines, stuffed it and it was good to go!


I loved the starfish flag Layla from The Lettered Cottage made.  Her tutorial is HERE.  I had such a fun time making it and am happy the way it ties in with the room.


So that's our room.  We would still love to change a few things.  My husband hates the color on the walls.  It looks much darker in these pictures than in person. In person it looks more like a sand color, but I'm sure we'll be painting before long...  We would also love to put new carpet in here and get a new comforter, but those will have to wait a bit.  And, if we do end up switching out to a regular king bed, he can make a new headboard out of wood. 

I am so excited to have reached over 100 followers!  Thanks so much for coming by.  I appreciate your visits and comments! 

Pam

I am linking up to the following parties:

The DIY Show Off Project Parade
Debbiedoo's Newbie Party
Between Naps on the Porch's Met Monday
Jennifer Rizzo's Refresh Your Room Party